
Why Your Pistol Hits Low at Close Range
You place the red dot exactly where you want the round to land, press the trigger cleanly—and the impact appears noticeably low.
At very close distances, that doesn’t necessarily mean your pistol or optic has a problem.
The optic sits above the bore of the handgun. Because the sighting system and bore are physically separated, the bullet’s path has not yet converged with your line of sight at distances significantly closer than your zero.
That difference is commonly described as “height over bore“, and understanding it becomes increasingly important when the target gets small.
This training exercise provides a straightforward way to determine the actual close-range offset of your pistol and practice compensating for it.
Where This Drill Came From
This exercise and printable target come from Brian Sells, a shooter and builder who shared the target while working through his own difficulty making precise hits on small rectangles at three yards.
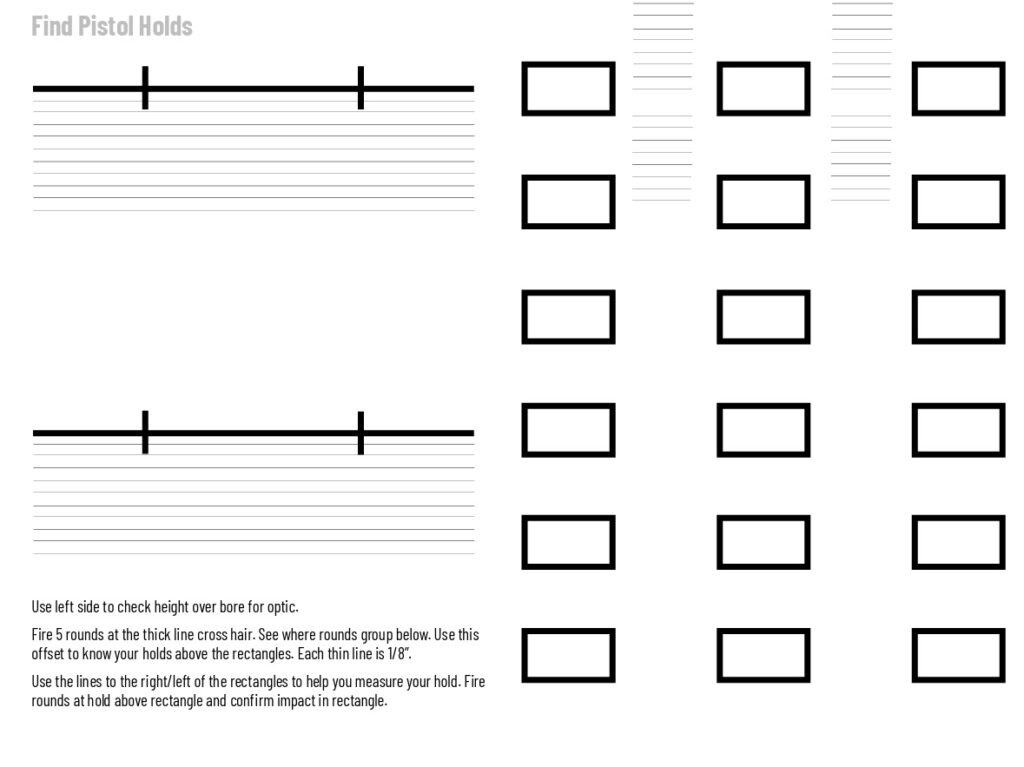
Sells was familiar with accounting for height over bore with rifles, but realized he hadn’t given the same consideration to his red-dot-equipped pistol. Once he measured the pistol’s close-range offset and adjusted his point of aim accordingly, his results improved substantially.
The target and training method presented here are credited to Brian Sells. You can follow his shooting and training content on Instagram at @brianrsells.
What You’ll Need
- Red-dot-equipped pistol
- Brian Sells’ printable target
- Safe shooting range
- Approximately 3 yards of distance
- Ammunition
- Marker
- Eye and ear protection
The target contains horizontal reference lines on one side and multiple small rectangles on the other. The thin horizontal lines are spaced at 1/8-inch intervals, allowing you to measure your pistol’s actual offset rather than estimating it.
Step One: Determine Your Offset
Place the target approximately 3 yards away.
Using the thick crosshair as your point of aim, fire a careful five-round group. Accuracy matters here; you’re trying to measure the mechanical relationship between your optic and bore, so poor fundamentals will make the measurement less useful.
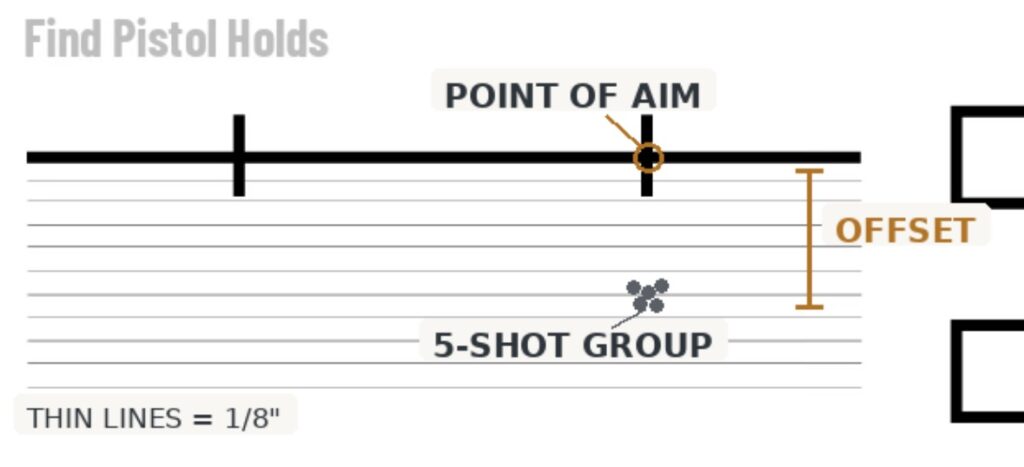
Keep the red dot centered on the same aiming point for every shot.
Your group should form below the aiming point. Measure the vertical difference using the target’s 1/8-inch reference lines. That measurement represents the approximate hold you’ll need at that distance with your particular pistol, optic, ammunition, and zero.
Brian’s setup—a Glock 34 with a Defender XL, 15-yard zero, and approximately 1.15-inch optic height over bore—produced impacts roughly 0.87 inch low at 3 yards. His practical correction was approximately a 7/8-inch hold.
Don’t simply copy that number. The purpose of the exercise is to determine your offset.
Step Two: Apply the Hold
Once you’ve measured the offset, move to the rectangles.
Instead of placing the dot directly on the rectangle, hold above it by the amount you just determined.
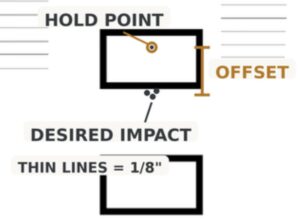
If your measured offset is 7/8 inch, for example, establish a point of aim approximately 7/8 inch above the desired point of impact.
Fire carefully and observe where the round lands.
The objective isn’t speed. You’re learning the visual relationship between where your optic must be aimed and where the bullet actually impacts at close range.
Step Three: Confirm It
Continue working through the rectangles while maintaining the same corrected hold.
Your impacts should begin appearing more consistently inside the boxes. If they don’t, return to the measurement portion of the target and verify your group and offset before making further changes.
Brian’s own progression illustrates the purpose well. His initial attempts produced numerous impacts below the rectangles. After measuring the offset and deliberately applying the corrected hold, the subsequent target was noticeably cleaner.
That’s the value of the exercise: immediate feedback followed by a measurable correction.
What This Drill Actually Teaches
This isn’t primarily an accuracy drill. It’s a confirmation drill. You’re learning that your red dot represents your line of sight—not the physical path of the bullet at every distance.
A pistol zero establishes a point where those paths intersect. At distances closer than that zero, particularly at only a few yards, the difference can become significant when attempting precise shots on small targets.
Larger targets can hide that difference. Brian’s small rectangles make it obvious.
Once you understand the relationship, you can account for it instead of wondering why otherwise well-executed shots consistently land low.
Don’t Memorize Someone Else’s Hold
The most important lesson is also the simplest: confirm the offset on your own equipment.
Optic mounting height, pistol configuration, ammunition, and zero distance can all influence point of impact.
A chart or another shooter’s measurement can help explain what should happen, but neither replaces shooting your own pistol and verifying the result.
If you change your optic, mounting arrangement, ammunition, or zero, it’s worth repeating the exercise.
Add It to Your Training
The Find Your Pistol Holds exercise requires little ammunition, provides immediate feedback, and teaches something that conventional bullseye shooting can easily conceal.
Run it when establishing or confirming a pistol optic, after changing your setup, or simply when you want to better understand what your handgun is doing at close range.
Download the Find Pistol Holds Target…
For more exercises designed to build measurable shooting skills, visit the MidAtlanticMunition Shooting Drills & Firearms Training Hub. And if you need ammo that’s as awesome as your shooting, check out our handgun ammo collection.